CDN Configuration
The recommended production configuration for Broadleaf is to use a CDN for serving static assets. CDN stands for Content Delivery Network. There are many commercial providers for CDNs. This guide will explain how to configure one such provider (Amazon Cloud Front). Other CDNs would follow similar configuration steps.
Why use a CDN?
CDNs provide caching of your images and static assets closer to your end customer (also called "edge caching"). This results in higher overall performance of your application and less load on your Broadleaf application and web servers.
What type of CDNs does Broadleaf support?
Broadleaf provides a dynamic image server. A benefit of this is that you can upload one high resolution image with your products (or other content types). This image can then be dynamically resized. For example, you might show a small "thumbnail" version of the image on your cart page and a "mobile optimized" version of the image for users browsing by phone.
By default, Broadleaf does this image manipulation the first time an image is requested.
Because of the dynamic image capabilities, Broadleaf requires a CDN that supports an "origin" server concept. This means that the first time an image is requested, the CDN will check the "origin" server (in this case, your Broadleaf application) to get the image. Future requests will be handled by the CDN without talking to Broadleaf.
Also, because Broadleaf manipulates images based on URL parameters the CDN must also support parameters. For example, you might have an image with a URL of "/myProductImage. To get the "cart" version of this image you might use a URL like "/myProductImage?cart",
Note for more information on image manipulation, see the Asset Server section.
High level CDN process flow
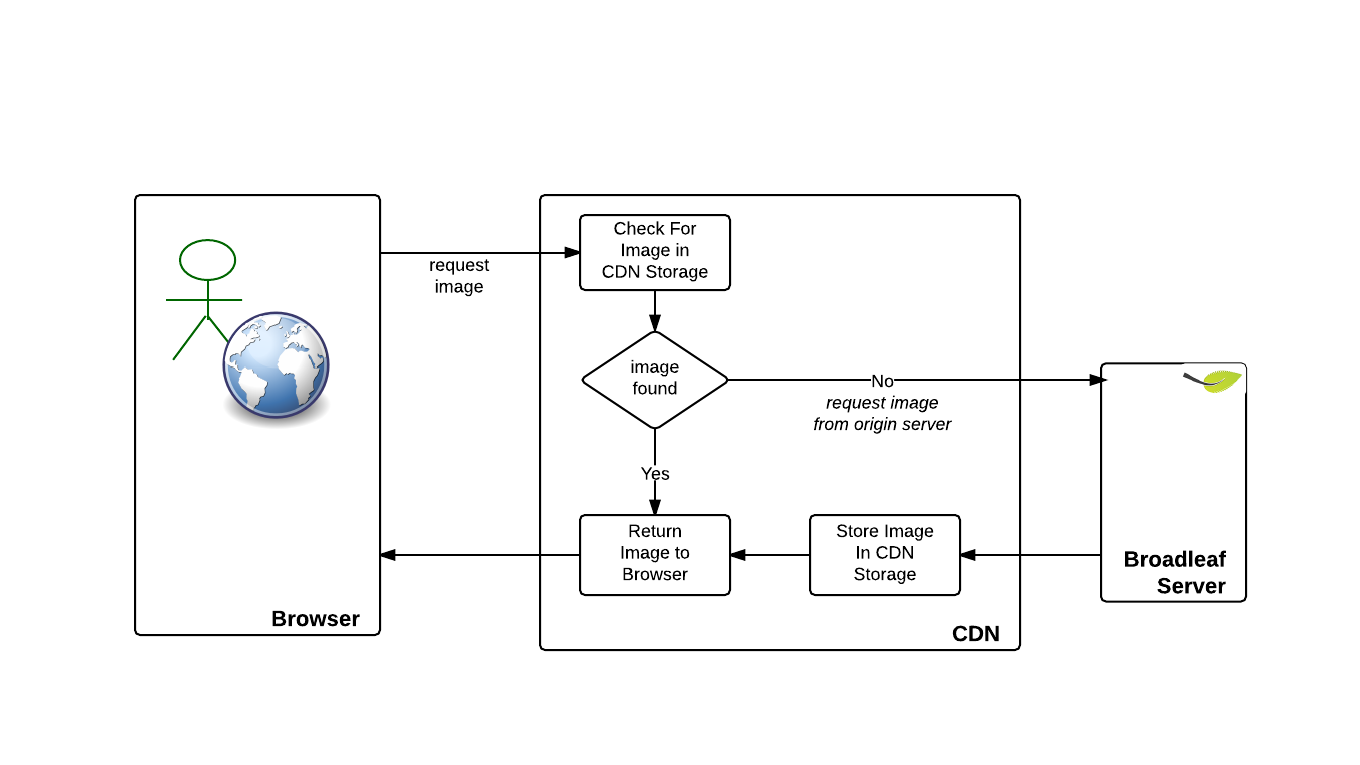
It is useful to understand how an image requested by a browser is typically served through Broadleaf.

In the above image, the browser requests an image from the CDN. If the CDN has the image then it returns it. If not, then it asks for the image from the "origin" server which in our case is Broadleaf.
Broadleaf Internals
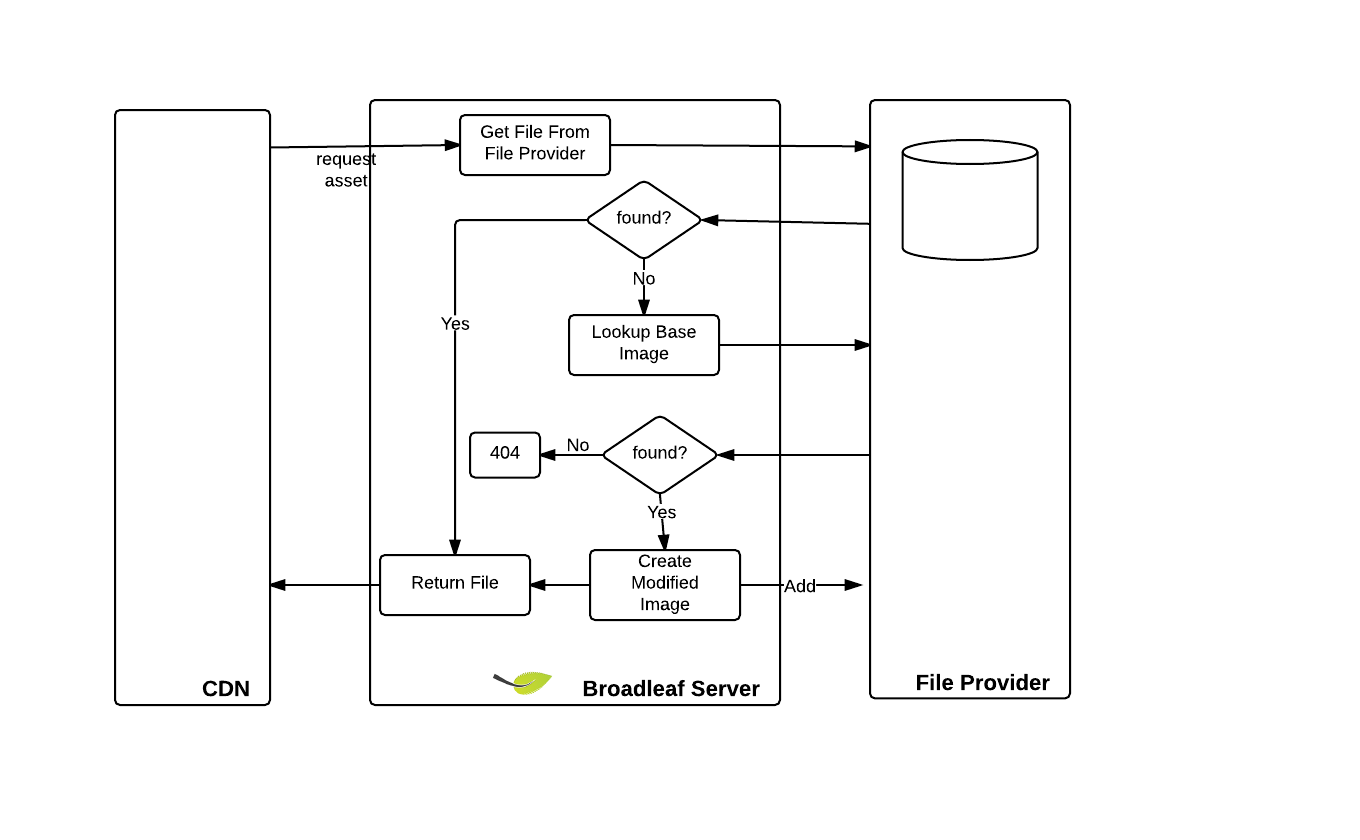
When a CDN requests an image from Broadleaf, Broadleaf must load the image from a FileProvider and possibly manipulate the image before returning it to the CDN. The following diagram outlines this process.

Note that the default Broadleaf FileProvider uses the file system and assumes that the file location is set to a shared network drive for distributed systems. It is also possible to use the database, Amazon-S3, or Rackspace-CloudFiles as your file provider.
Configuring Broadleaf for CDN access
Broadleaf relies on a few properties to configure CDN setup.
# Prefix used to indicate to indicate that a resource is a CMS resource
# that should be served by the CDN.
# You can change this but probably best to leave it at the default value
asset.server.url.prefix.internal=cmsstatic

# This is the URL that customers will see when rendering static assets
# (e.g. if you do a view source in the browser)
asset.server.url.prefix=http://static.mysite.com/cmsstatic

# This is the URL that customers will see when rendering static assets
# from secure (https) pages.  Note, you'll need a valid SSL certificate
# so you may want to use your CDN's default https option here instead of
# a DNS managed URL
#
asset.server.url.prefix.secure=https://static.mysite.com/cmsstatic
Example: Setting up Amazon Cloud Front as your Broadleaf CDN
Steps to provision a CDN vary by provider. Here are steps for setting up Amazon Cloud Front to work with Broadleaf.
These steps assume you have an Amazon AWS account and were valid as of September 3, 2014.
Step 1 : Access the AWS management console. (console.aws.amazon.com).
Step 2 : Click on Cloud Front to access the CloudFront console
Step 3 : Choose the "Web" to create a "Web" distribution and then select the "Get Started" button
Step 4 : Fill out the "Origin Settings" on the "Create Distribution" form
- Origin Domain : www.mybroadleafsite.com
- Origin ID: You can use the default value
- Origin Policy: Choose HTTP Only
- HTTP Port/HTTPS Port: Match your server configuration (typically 80/443)
Step 5 : Fill out the "Origin Settings" on the "Create Distribution" form
- Change the forward query strings from the default of Yes to No. This is important in order to use broadleaf's dynamic image manipulation capabilities.
- You can accept all other defaults but you may want to control cache timeout headers by overriding the object caching section
Step 6 : Optionally fill out the distribution settings
- Follow the instructions on the distribution settings to provide a custom image domain (e.g. static.mysite.com) instead of
using the default *.cloudfront.net URL for your images.
- For initial testing, you should ignore this section, get the CDN working and then circle back to this step. Note that you'll want to review the section on SSL certificates in advance of moving to production if you plan to use a custom URL
Verifying CDN Configuration
In your page templates, you need to use "blc:src" in order to have the URL's rewritten for use with the CDN.
Here is an example,
<img blc:src="@{/img/broadleaf-seal.png}" alt="Broadleaf Commerce" />
Broadleaf provides a UrlRewriteProcessor that rewrites assets created through the Broadleaf admin. The processor manipulates the "src" attribute of any item whose source starts with "/cmsstatic/" replacing it with the values configured by the asset.server properties defined above.
Once you have everything setup, Test your page by right clicking on a product image from your browser (e.g. chrome) and choosing inspect. Ensure that the image is prefixed with your CDN configured value ...
For example,
<img src="http://static.mysite.com/cmsstatic/product/951/myproduct.jpg" alt="My Product">
Summary
Using a CDN can greatly reduce the hardware and network requirements in the Broadleaf infrastructure and improve overall end user performance through page load times.
