API Import
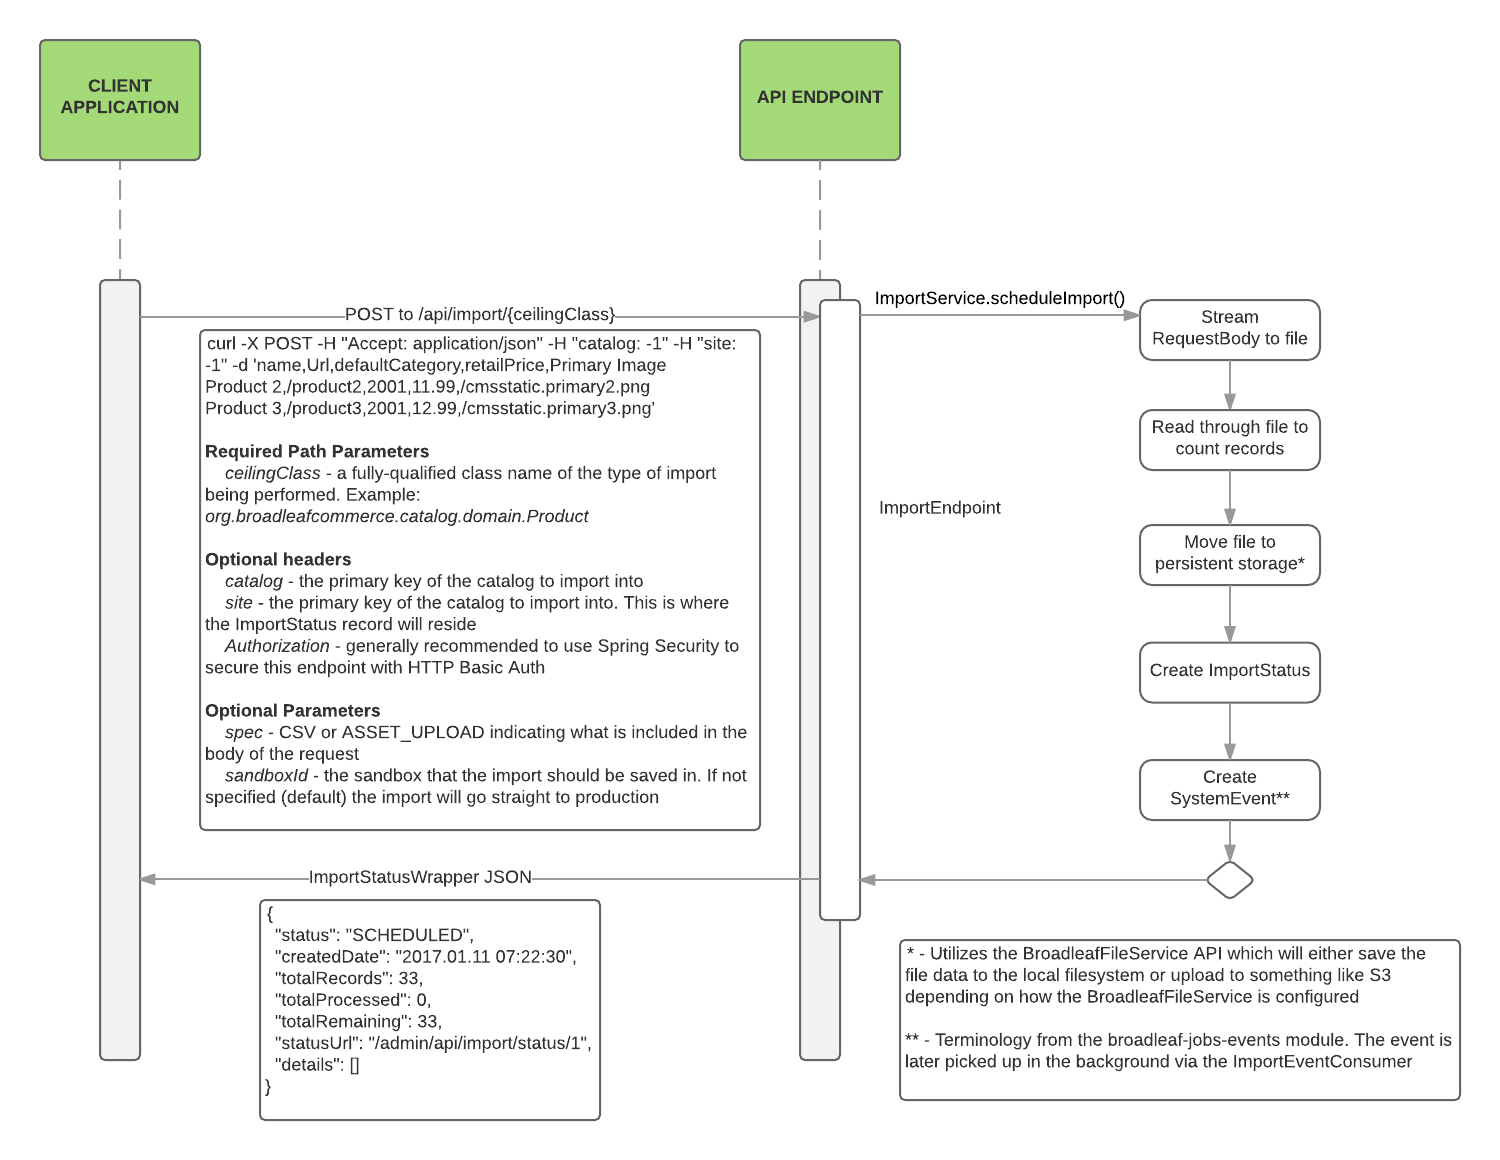
The API import is the same format as the CSV file import through the admin with the CSV portion of the request sent in the
body. The import endpoint is available at /api/import so if you have the admin application deployed as admin.war the
full url is /admin/api/import. Below is a high-level overview of how the endpoint works:

/api/import/{importType}, POST
URI Parameters
- importType - The type of import to run, should map directly to a
ImportTypeenumeration. Examples:- Product import -
PRODUCT - Category import -
CATEGORY - Bulk asset upload -
ASSET
- Product import -
Request Parameters
- sandboxId - optional, allows importing into a particular sandbox. If not specific the import goes straight to production
- spec - defaults to
CSV. Currently supportsCSVorASSET_UPLOAD
Request Headers
- catalog - the ID of the catalog that the items should be imported into
- site - the ID of the site that the items should be imported into
Request Body
If executing a CSV-based import, the request body should be the CSV data to be imported. If executing a bulk asset upload
then the request body should be the .zip file containing the assets.
Response
The response is a JSON object representing the scheduled ImportStatus that also includes the status URL representing where
you should poll to determine the status of the import. Example:
{
  "status": "SCHEDULED",
  "createdDate": "2017.01.11 07:22:30",
  "totalRecords": 33,
  "totalProcessed": 0,
  "totalRemaining": 33,
  "statusId": 6,
  "statusUrl": "/admin/api/import/status/6",
}
/api/import/{statusId}, GET
URI Parameters
- statusId - the primary key of the import status you are trying to retrieve
Response
The response is a JSON object representing the scheduled ImportStatus. Example:
{
  "status": "IN_PROCESS",
  "createdDate": "2017.01.11 07:22:30",
  "totalRecords": 33,
  "totalProcessed": 15,
  "totalRemaining": 18,
  "lastUpdateDate": "2017.01.11 07:22:50",
  "statusId": 6
}
If the import has completed, you would see something like this:
{
  "status": "COMPLETED",
  "createdDate": "2017.01.11 07:22:30",
  "totalRecords": 33,
  "totalProcessed": 33,
  "totalRemaining": 0,
  "lastUpdateDate": "2017.01.11 07:22:50",
  "statusId": 6
}
If there were errors, those come as apart of the details array inside the returned JSON:
{
  "status": "COMPLETED",
  "createdDate": "2017.01.11 07:22:30",
  "totalRecords": 33,
  "totalProcessed": 33,
  "totalRemaining": 0,
  "lastUpdateDate": "2017.01.11 07:22:50",
  "statusId": 6
}
Example Requests
Import 2 products into the -1 catalog and the -1 site:
curl -X POST -H "Accept: application/json" -H "catalog: -1" -H "site: -1" -d 'name,Url,defaultCategory,retailPrice,Primary Image
Product 2,/product2,2001,11.99,/cmsstatic.primary2.png
Product 3,/product3,2001,12.99,/cmsstatic.primary3.png' "http://test.blc.dev:8081/admin/api/import/PRODUCT"
Import 2 products into the catalog and site resolved by the current URL (undergoes the same site domain matching as other multi-tenant functionality):
curl -X POST -H "Accept: application/json" -d 'name,Url,defaultCategory,retailPrice,Primary Image
Product 2,/product2,2001,11.99,/cmsstatic.primary2.png
Product 3,/product3,2001,12.99,/cmsstatic.primary3.png' "http://test.blc.dev:8081/admin/api/import/PRODUCT"
API Security
Security in the admin can be done a number of ways with Spring Security. The easiest implementation of this is to use HTTP Basic security
and the existing blAdminAuthenticationProvider. In order to enable this, we recommend creating a new API Admin User that
has all the same roles and permissions as the global super user. This serves 2 purposes:
- Ensures that your API user can performa all operations and will not be blocked by the admin security services
- Allows you to track changes that were performed by this separate admin user, for instance if you are importing into a sandbox
To ensure the /api/** paths use a different security mechanism, add an additional WebSecurityConfigurerAdapter:
// Explicit order to appear before any unordered security configs
@Order(1)
@Configuration
public class AdminApiSecurityConfiguration extends WebSecurityConfigurerAdapter {

    @Resource(name = "blAdminUserDetailsService")
    protected UserDetailsService adminUserDetailsService;

    @Resource(name = "blAdminPasswordEncoder")
    protected PasswordEncoder passwordEncoder;

    @Resource(name = "blAdminAuthenticationProvider")
    protected AuthenticationProvider authenticationProvider;

    @Override
    protected void configure(AuthenticationManagerBuilder auth) throws Exception {
        auth.userDetailsService(adminUserDetailsService).passwordEncoder(passwordEncoder);
    }

    @Override
    protected void configure(HttpSecurity http) throws Exception {
        // @formatter:off
        http
            .authenticationProvider(authenticationProvider)
            .antMatcher("/api/**")
            .authorizeRequests()
                .antMatchers("/**")
                .access("isAuthenticated()")
                .and()
            // HTTP Basic credentials
            .httpBasic()
                .and()
            .csrf().disable()
            .sessionManagement()
                .sessionCreationPolicy(SessionCreationPolicy.STATELESS)
                .sessionFixation()
                .none()
                .enableSessionUrlRewriting(false);
        // @formatter:on
    }

}
Since this uses the same AuthenticationProvider as the regular AdminSecurityConfig for the rest of the application, you can use credentials of any admin user (like the special API admin user you created earlier). Alternatively, you can use a completely separate UserDetailsService and underlying AuthenticationProvider to separate these users.
XML Configuration
If you are using XML configuration in a project that was not originally based on Spring Boot, use this configuration:
<sec:http pattern="/api/**" create-session="stateless" authentication-manager-ref="blAdminAuthenticationManager">
    <sec:http-basic />
    <sec:csrf disabled="true" />
    <sec:custom-filter ref="blAdminRestPreSecurityFilterChain" before="CHANNEL_FILTER"/>
    <sec:custom-filter ref="blAdminRestPostSecurityFilterChain" after="SWITCH_USER_FILTER"/>
</sec:http>
Then add the following to applicationContext-admin-filter.xml:
<bean id="blAdminRestPreSecurityFilterChain" class="org.springframework.security.web.FilterChainProxy">
    <sec:filter-chain-map request-matcher="ant">
        <sec:filter-chain pattern="/**" filters="
           openEntityManagerInViewFilter,
           blMultiTenantAdminRequestFilter"/>
    </sec:filter-chain-map>
</bean>

<bean id="blAdminRestPostSecurityFilterChain" class="org.springframework.security.web.FilterChainProxy">
    <sec:filter-chain-map request-matcher="ant">
        <sec:filter-chain pattern="/**" filters="
           resourceUrlEncodingFilter,
           blAdminRequestFilter,
           hiddenHttpMethodFilter,
           blLog4jMappedDiagnosticContextFilter"/>
    </sec:filter-chain-map>
</bean>
}
If you are not using multi tenant, remove the
blMultiTenantAdminRequestFilterbean id
